Taguchi Orthogonal Arrays: Difference between revisions
Jump to navigation
Jump to search

Lisa Hacker (talk | contribs) No edit summary |
|||
| (20 intermediate revisions by 4 users not shown) | |||
| Line 1: | Line 1: | ||
{{Template:Doebook|Appendix D|Taguchi Orthogonal Arrays}} | |||
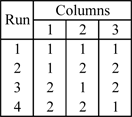
==Two Level Designs== | ==Two Level Designs== | ||
'''L4 (2^3)''' | '''L4 (2^3)''' | ||
[[Image:ct1.png|center|132px|link=]] | |||
[[ | |||
| Line 13: | Line 11: | ||
[[Image:ct2.png|center|262px|link=]] | |||
[[ | |||
| Line 21: | Line 17: | ||
[[ | [[Image:ct3.png|center|368px|link=]] | ||
| Line 27: | Line 23: | ||
[[ | [[Image:ct4.png|center|489px|link=]] | ||
==Three Level Designs== | ==Three Level Designs== | ||
| Line 33: | Line 29: | ||
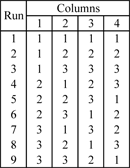
'''L9 (3^4)''' | '''L9 (3^4)''' | ||
[[Image:ct5.png|center|130px|link=]] | |||
[[ | |||
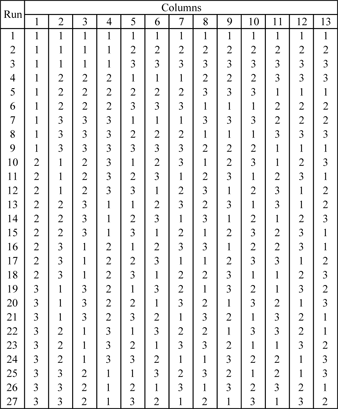
'''L27 (3^13)''' | '''L27 (3^13)''' | ||
[[Image:ct6.png|center|338px|link=]] | |||
[[ | |||
==Mixed Level Designs== | ==Mixed Level Designs== | ||
| Line 47: | Line 40: | ||
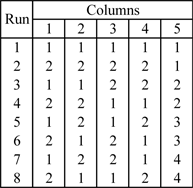
'''L8 (2^4 4^1)''' | '''L8 (2^4 4^1)''' | ||
[[Image:ct7.png|center|193px|link=]] | |||
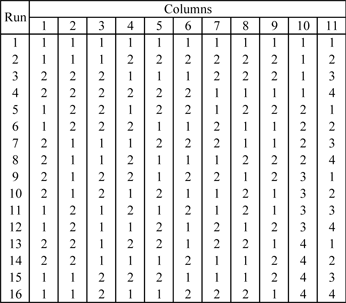
'''L16 (2^12 4^1)''' | '''L16 (2^12 4^1)''' | ||
[[Image:ct8.png|center|445px|link=]] | |||
'''L16 (2^9 4^2)''' | '''L16 (2^9 4^2)''' | ||
[[Image:ct9.png|center|346px|link=]] | |||
'''L16 (2^6 4^3)''' | '''L16 (2^6 4^3)''' | ||
[[Image:ct10.png|center|289px|link=]] | |||
| Line 72: | Line 61: | ||
[[Image:ct11.png|center|225px|link=]] | |||
'''L18 (2^1 3^7)''' | '''L18 (2^1 3^7)''' | ||
[[Image:ct12.png|center|253px|link=]] | |||
Latest revision as of 19:06, 15 September 2023

Two Level Designs
L4 (2^3)
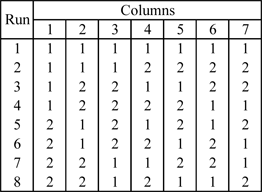
L8 (2^7)
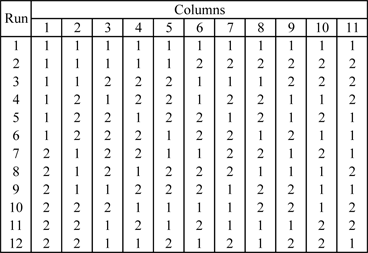
L12 (2^11)
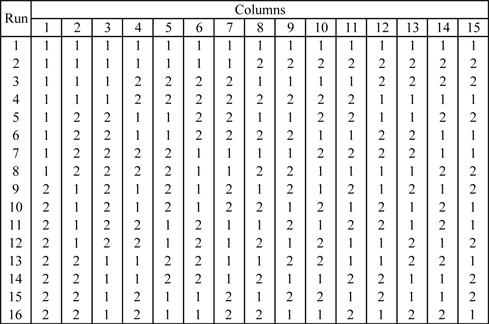
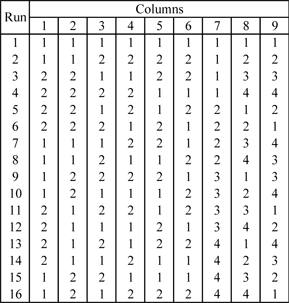
L16 (2^15)
Three Level Designs
L9 (3^4)
L27 (3^13)
Mixed Level Designs
L8 (2^4 4^1)
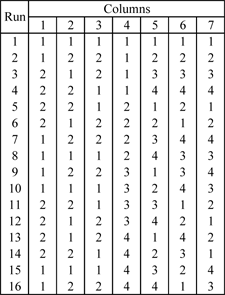
L16 (2^12 4^1)
L16 (2^9 4^2)
L16 (2^6 4^3)
L16 (2^3 4^4)
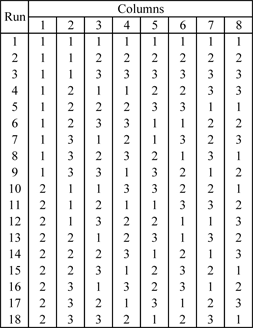
L18 (2^1 3^7)