BlockSim Analytical Examples
BlockSim Analytical Example
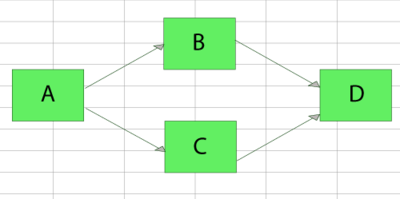
Obtain the reliability equation of the following system.
Solution
The successful paths for this system are:
- [math]\displaystyle{ {{X}_{1}}=ABD\text{ and }{{X}_{2}}=ACD }[/math]
The reliability of the system is simply the probability of the union of these paths:
- [math]\displaystyle{ {{R}_{s}}=P({{X}_{1}}\cup {{X}_{2}}) }[/math]
- [math]\displaystyle{ \begin{align} P({{X}_{1}}\cup {{X}_{2}})= & P({{X}_{1}})+P({{X}_{2}})-P({{X}_{1}}\cap {{X}_{2}}) \\ = & P(ABD)+P(ACD)-P(ABCD) \end{align} }[/math]
- Thus:
- [math]\displaystyle{ {{R}_{s}}={{R}_{A}}{{R}_{B}}{{R}_{D}}+{{R}_{A}}{{R}_{C}}{{R}_{D}}-{{R}_{A}}{{R}_{B}}{{R}_{C}}{{R}_{D}} }[/math]
BlockSim Analytical Example
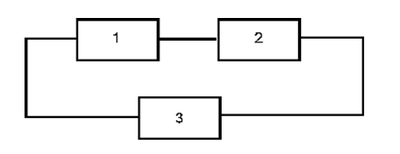
Obtain the reliability equation of the following system.
BlockSim Analytical Example
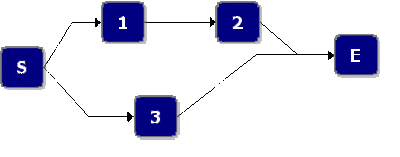
Assume starting and ending blocks that cannot fail, as shown next.
The paths for this system are:
- [math]\displaystyle{ {{X}_{1}}=1,2\text{ and }{{X}_{2}}=3 }[/math]
The probability of success of the system is given by:
- [math]\displaystyle{ \begin{align} P({{X}_{1}}\cup {{X}_{2}})= & P({{X}_{1}})+P({{X}_{2}})-P({{X}_{1}}\cap {{X}_{2}}) \\ = & P(1,2)+P(3)-P(1,2,3) \end{align} }[/math]
- Or:
- [math]\displaystyle{ {{R}_{s}}={{R}_{1}}{{R}_{2}}+{{R}_{3}}-{{R}_{1}}{{R}_{2}}{{R}_{3}} }[/math]
Starting and Ending Blocks in BlockSim
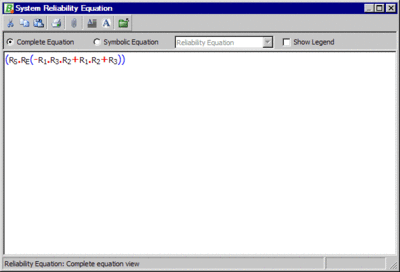
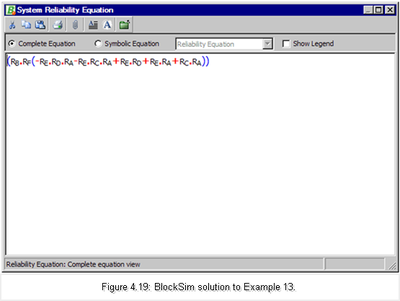
Note that BlockSim requires that all diagrams start from a single block and end on a single block. To meet this requirement for this example, we arbitrarily added a starting and an ending block, as shown in Figure Ch4fig21. These blocks can be set to a cannot fail condition, or [math]\displaystyle{ R=1 }[/math] , and thus not affect the outcome. However, when the analysis is performed in BlockSim, the returned equation will include terms for the non-failing blocks, as shown in Figure Ch4fig22 and Eqn. (8).
- [math]\displaystyle{ {{R}_{system}}=({{R}_{S}}\cdot {{R}_{E}}(-{{R}_{1}}\cdot {{R}_{2}}\cdot {{R}_{3}}+{{R}_{1}}\cdot {{R}_{2}}+{{R}_{3}})) }[/math]
Note that since [math]\displaystyle{ {{R}_{S}}={{R}_{E}}=1 }[/math] , the system equation, Eqn. (eqnonfailed), can be reduced to:
- [math]\displaystyle{ \begin{align} {{R}_{system}}= & (1\cdot 1(-{{R}_{1}}\cdot {{R}_{2}}\cdot {{R}_{3}}+{{R}_{1}}\cdot {{R}_{2}}+{{R}_{3}})) \\ = & -{{R}_{1}}\cdot {{R}_{2}}\cdot {{R}_{3}}+{{R}_{1}}\cdot {{R}_{2}}+{{R}_{3}} \end{align} }[/math]
This is equivalent to Eqn. (ex11s). The reason that BlockSim includes all items regardless of whether they can fail or not is because BlockSim only recomputes the equation when the system structure has changed. What this means is that the user can alter the failure characteristics of an item without altering the diagram structure. For example, a block that was originally set not to fail can be re-set to a failure distribution and thus it would need to be used in subsequent analyses.
BlockSim Analytical Example
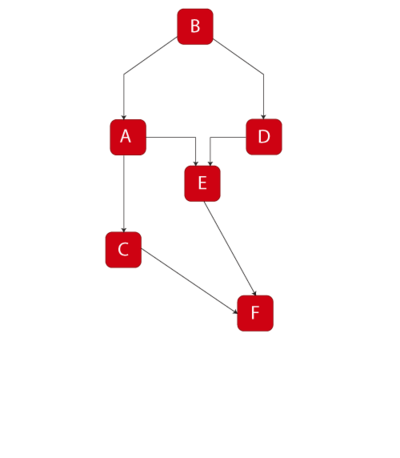
For this example:
- [math]\displaystyle{ a) }[/math] Determine the reliability equation of the system shown in Figure Ch4fig9 using the decomposition method.
- [math]\displaystyle{ b) }[/math] Determine the reliability equation of the same system using BlockSim.
Solution
To obtain the solution:
- [math]\displaystyle{ a) }[/math] Choose A as the key component, then:
- [math]\displaystyle{ \begin{align} {{R}_{s}}= & P(s|A)P(A)+P(s|\overline{A})P(\overline{A}) \\ P(s| A)= &{{R}_{B}}{{R}_{F}}\left[ 1-\left( 1-{{R}_{C}} \right)\left( 1-{{R}_{E}} \right) \right] \\ P(s| \overline{A})= &{{R}_{B}}{{R}_{D}}{{R}_{E}}{{R}_{F}} \\ {{R}_{s}}= & \left[ {{R}_{B}}{{R}_{F}}\left[ 1-\left( 1-{{R}_{C}} \right)\left( 1-{{R}_{E}} \right) \right] \right]{{R}_{A}}+\left[ {{R}_{B}}{{R}_{D}}{{R}_{E}}{{R}_{F}} \right](1-{{R}_{A}}) \end{align} }[/math]
- [math]\displaystyle{ b) }[/math] Using BlockSim:
- [math]\displaystyle{ {{R}_{s}}={{R}_{B}}\cdot {{R}_{F}}(-{{R}_{A}}\cdot {{R}_{C}}\cdot {{R}_{E}}-{{R}_{A}}\cdot {{R}_{D}}\cdot {{R}_{E}}+{{R}_{A}}\cdot {{R}_{C}}+{{R}_{A}}\cdot {{R}_{E}}+{{R}_{D}}\cdot {{R}_{E}}) }[/math]
BlockSim Analytical Example
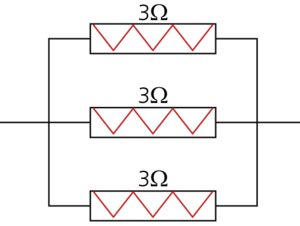
Consider the following circuit:
The equivalent resistance must always be less than [math]\displaystyle{ 1.2\Omega }[/math] .
Draw the reliability block diagram for this circuit.
Solution
First, let's consider the case where all three resistors operate:
- [math]\displaystyle{ \begin{align} \frac{1}{{{r}_{eq}}}= & \frac{1}{{{r}_{1}}}+\frac{1}{{{r}_{2}}}+\frac{1}{{{r}_{3}}} \\ = & \frac{1}{3}+\frac{1}{3}+\frac{1}{3} \\ = & 1\Omega \end{align} }[/math]
Thus, when all components operate, the equivalent resistance is [math]\displaystyle{ 1\Omega }[/math] , which is less than the maximum resistance of [math]\displaystyle{ 1.2\Omega }[/math] .
Next, consider the case where one of the resistors fails open. In this case, the resistance for the resistor is infinite and the equivalent resistance is:
- [math]\displaystyle{ \frac{1}{{{r}_{eq}}}=\frac{1}{\infty }+\frac{1}{3}+\frac{1}{3}=\frac{2}{3} }[/math]
- Thus:
- [math]\displaystyle{ {{r}_{eq}}=1.5\Omega \gt 1.2\Omega \text{ - System failed}\text{.} }[/math]
If two resistors fail open (e.g. #1 and #2), the equivalent resistance is:
- [math]\displaystyle{ \frac{1}{{{r}_{eq}}}=\frac{1}{\infty }+\frac{1}{\infty }+\frac{1}{3}=\frac{1}{3} }[/math]
- Thus:
- [math]\displaystyle{ {{r}_{eq}}=3\Omega \gt 1.2\Omega \text{ - System failed}\text{.} }[/math]
If all three resistors fail open:
- [math]\displaystyle{ {{r}_{eq}}=\infty \gt 1.2\Omega \text{ - System failed}\text{.} }[/math]
Thus, if [math]\displaystyle{ {{r}_{1}} }[/math] , [math]\displaystyle{ {{r}_{2}} }[/math] , [math]\displaystyle{ {{r}_{3}} }[/math], or any combination of the three fails, the system fails. Put another way, [math]\displaystyle{ {{r}_{1}} }[/math] and [math]\displaystyle{ {{r}_{2}} }[/math] and [math]\displaystyle{ {{r}_{3}} }[/math] must succeed in order for the system to succeed.
The RBD is:
In this example it can be seen that even though the three components were physically arranged in parallel, their reliability-wise arrangement is in series.
Example 15
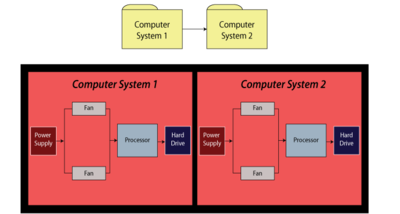
For this example, obtain the reliability equation of the system shown in Figure fig29.
Solution to Example 15
The system reliability equation is:
- [math]\displaystyle{ {{R}_{System}}={{R}_{Computer1}}\cdot {{R}_{Computer2}} }[/math]
- Now:
- [math]\displaystyle{ \begin{align} {{R}_{Computer1}}= & ({{R}_{Power\,Supply}}\cdot {{R}_{Processor}}\cdot {{R}_{HardDrive}} \\ &\cdot(-{{R}_{Fan}}\cdot {{R}_{Fan}}+{{R}_{Fan}}+{{R}_{Fan}})) \end{align} }[/math]
Since the structures of the computer systems are the same, [math]\displaystyle{ {{R}_{Computer1}}={{R}_{Computer2}} }[/math] , then substituting Eqn. (excomp2a) into Eqn. (excomp) yields:
- [math]\displaystyle{ \begin{align} {{R}_{System}}= & ({{R}_{Power\,Supply}}\cdot {{R}_{Processor}}) \\ & \cdot {{R}_{HardDrive}}(-R_{Fan}^{2}+2{{R}_{Fan}}){{)}^{2}} \end{align} }[/math]
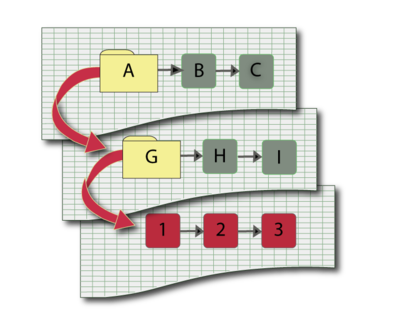
When using BlockSim to compute the equation, the software will return Eqn. (excomp) for the system and Eqn. (excomp2a) for the subdiagram. Even though BlockSim will make these substitutions internally when performing calculations, it does show them in the System Reliability Equation window.
Example 16
In the diagram shown in Figure Fig32, electricity can flow in both directions. Successful system operation requires at least one output (O1, O2 or O3) to be working.
Create a block diagram for this system.
Solution to Example 16
The bidirectionality of this system can be modeled using mirrored blocks. The diagram is shown in Figure fig33a.
Blocks 5A, 7A and 1A are duplicates (or mirrored blocks) of 5, 7 and 1 respectively.
Example 18
Assume that a system has six failure modes: A, B, C, D, E and F. Furthermore, assume that failure of the entire system will occur if:
- • Mode B, C or F occurs.
- • Modes A and E, A and D or E and D occur.
Draw the block diagram and obtain the reliability equation.
Solution to Example 18
The diagram is shown in Figure fig35
The reliability equation, as obtained from BlockSim is:
- [math]\displaystyle{ \begin{align} {{R}_{System}}= & (-2{{R}_{A}}\cdot {{R}_{B}}\cdot {{R}_{C}}\cdot {{R}_{D}}\cdot {{R}_{2/3}}\cdot {{R}_{E}}\cdot {{R}_{F}} \\ & +{{R}_{A}}\cdot {{R}_{B}}\cdot {{R}_{C}}\cdot {{R}_{D}}\cdot {{R}_{2/3}}\cdot {{R}_{F}} \\ & +{{R}_{A}}\cdot {{R}_{B}}\cdot {{R}_{C}}\cdot {{R}_{2/3}}\cdot {{R}_{E}}\cdot {{R}_{F}} \\ & +{{R}_{B}}\cdot {{R}_{C}}\cdot {{R}_{D}}\cdot {{R}_{2/3}}\cdot {{R}_{E}}\cdot {{R}_{F}}) \end{align} }[/math]
The BlockSim equation includes the node reliability term [math]\displaystyle{ {{R}_{2/3}}, }[/math] which cannot fail, or [math]\displaystyle{ {{R}_{2/3}}=1 }[/math] . This can be removed, yielding:
- [math]\displaystyle{ \begin{align} {{R}_{System}}= & (-2{{R}_{A}}\cdot {{R}_{B}}\cdot {{R}_{C}}\cdot {{R}_{D}}\cdot {{R}_{E}}\cdot {{R}_{F}} \\ & +{{R}_{A}}\cdot {{R}_{B}}\cdot {{R}_{C}}\cdot {{R}_{D}}\cdot {{R}_{F}} \\ & +{{R}_{A}}\cdot {{R}_{B}}\cdot {{R}_{C}}\cdot {{R}_{E}}\cdot {{R}_{F}} \\ & +{{R}_{B}}\cdot {{R}_{C}}\cdot {{R}_{D}}\cdot {{R}_{E}}\cdot {{R}_{F}}) \end{align} }[/math]
